Quick answer: use the advertised picture size when you are not using a mount. With a mount, start from the visible opening and add 3 to 5 mm behind every edge. Then check that the paper still fits inside the frame.
Why one frame can have four different sizes
Picture frame listings use the word size for several different measurements. This is why a print that sounds right can turn out too small for the mount or too large for the back of the frame.
Take the IKEA RÖDALM 40 × 50 cm as an example. Its outside edge is about 42 × 52 cm (16.5 × 20.5 in), the full picture format is 40 × 50 cm (15.7 × 19.7 in), and the included mount opening is 29 × 39 cm (11.4 × 15.4 in). If you keep the mount, the suggested print is 30 × 40 cm (11.8 × 15.7 in). Each number is correct, but each describes something different.
| Measurement | Size | What it tells you |
|---|---|---|
| Outside frame size | 42 × 52 cm ≈ 16.5 × 20.5 in | The wall space taken up by the complete frame. |
| Picture or order size | 40 × 50 cm ≈ 15.7 × 19.7 in | The print size used when the mount is removed. |
| Mount opening | 29 × 39 cm ≈ 11.4 × 15.4 in | The part of the picture that remains visible. |
| Suggested paper size | 30 × 40 cm ≈ 11.8 × 15.7 in | The opening plus 5 mm of paper hidden behind every edge. |
IKEA RÖDALM frame and print size chart
RÖDALM is a useful reference because IKEA publishes both the picture format and the opening of the included mount. The table shows the print to use with the mount and the print to use when you remove it.
| IKEA frame size | Mount opening | Print with mount | Print without mount |
|---|---|---|---|
| 10 × 15 cm≈ 3.9 × 5.9 in | 7 × 11 cm≈ 2.8 × 4.3 in | 8 × 12 cm≈ 3.1 × 4.7 in | 10 × 15 cm≈ 3.9 × 5.9 in |
| 13 × 18 cm≈ 5.1 × 7.1 in | 9 × 14 cm≈ 3.5 × 5.5 in | 10 × 15 cm≈ 3.9 × 5.9 in | 13 × 18 cm≈ 5.1 × 7.1 in |
| 21 × 30 cm≈ 8.3 × 11.8 in | 12 × 17 cm≈ 4.7 × 6.7 in | 13 × 18 cm≈ 5.1 × 7.1 in | 21 × 30 cm≈ 8.3 × 11.8 in |
| 30 × 40 cm≈ 11.8 × 15.7 in | 20 × 29 cm≈ 7.9 × 11.4 in | 21 × 30 cm≈ 8.3 × 11.8 in | 30 × 40 cm≈ 11.8 × 15.7 in |
| 40 × 50 cm≈ 15.7 × 19.7 in | 29 × 39 cm≈ 11.4 × 15.4 in | 30 × 40 cm≈ 11.8 × 15.7 in | 40 × 50 cm≈ 15.7 × 19.7 in |
| 50 × 70 cm≈ 19.7 × 27.6 in | 39 × 49 cm≈ 15.4 × 19.3 in | 40 × 50 cm≈ 15.7 × 19.7 in | 50 × 70 cm≈ 19.7 × 27.6 in |
| 61 × 91 cm≈ 24 × 35.8 in | 49 × 69 cm≈ 19.3 × 27.2 in | 50 × 70 cm≈ 19.7 × 27.6 in | 61 × 91 cm≈ 24 × 35.8 in |
| 70 × 100 cm≈ 27.6 × 39.4 in | 49 × 69 cm≈ 19.3 × 27.2 in | 50 × 70 cm≈ 19.7 × 27.6 in | 70 × 100 cm≈ 27.6 × 39.4 in |
These sizes use a 5 mm overlap at every edge, about 3/16 in. IKEA UK sells RÖDALM using the same metric size labels and product dimensions as continental European markets. The inch values here are approximate conversions, not separate rounded UK or US frame sizes. RÖDALM is not currently listed in the IKEA US catalogue. Product ranges can change, so confirm your local listing before ordering. IKEA UK 30 × 40 cm RÖDALM. IKEA RÖDALM.
Does the same chart work for every IKEA frame?
Not quite. RÖDALM, LOMVIKEN, KNOPPÄNG, SILVERHÖJDEN and KLOTKÖRSBÄR use the same common mount openings for many matching picture formats, but the available sizes and outside dimensions vary. SANNAHED uses square openings. FISKBO, YLLEVAD and HÄCKHAGTORN are often used without a mount, so the listed picture format is normally the print size to start from.
Check the exact series, not just the number on the shelf label. In the planner, selecting the manufacturer, model and format loads the measurements for that specific product.
A rule for any frame
How to calculate the right print size
Find the visible opening
Measure the width and height of the opening that will actually show your picture. If you are using a mount, also called a mat, measure its window rather than the outside of the mount.
Add a small overlap
Add 3 to 5 mm behind every edge. That means adding 6 to 10 mm to both the opening width and opening height. The overlap helps keep the print in place and keeps a slight cutting or positioning difference from revealing a gap.
Choose the closest paper size that is large enough
Start with the minimum paper size you just calculated. Use that exact custom size, or choose the smallest standard print size that covers it without exceeding the space available inside the frame.
Check the crop before printing
The print and opening may have different proportions. Preview the crop so an important face, signature, or line of text does not disappear behind the mount.
Why the smallest suitable print is usually the best choice
A larger sheet may still fit, but more of the picture will sit behind the mount. Choosing the smallest standard size that safely covers the opening wastes less paper and makes the crop easier to understand.
Sometimes the calculation does not land on a standard photo or paper size. You can order the exact custom size, trim a larger sheet, or use the next standard size that fits. Always check the aspect ratio before printing. A 4:5 image and a 3:4 opening need a crop even when the paper itself is large enough.
How to check the suggested print size in the planner
The recommendation belongs to an individual frame, so start by selecting the exact frame you want to print for.
Prefer inches? Choose in in the display-units control at the top of the planner. The panel will show inch measurements and recommend from common US print and paper sizes. IKEA order formats remain labelled in centimetres because the UK and European products are designed and published in metric sizes. Treat the inch equivalents in this guide as conversions, not as different RÖDALM models.
Add or select the frame
Open the planner, choose a wall, and select cm or in from the top bar. Then use Add frame. If the frame is already in your layout, click it to open its edit panel.
Enter the frame and mount details
For an IKEA frame, choose IKEA, the frame series, and the order format. For another frame, enter its outside size, rail and mount measurements. Keep the Mat control switched on only if you plan to use a mount.
Open Suggested print size
Scroll towards the bottom of the frame edit panel and click Suggested print size. It sits below the frame and mount controls.
Read and adjust the recommendation
Check the visible opening, minimum paper and suggested print. Use the 3 mm, 5 mm or 10 mm buttons to change how much paper is hidden behind every edge. Any other standard sizes that fit appear underneath.
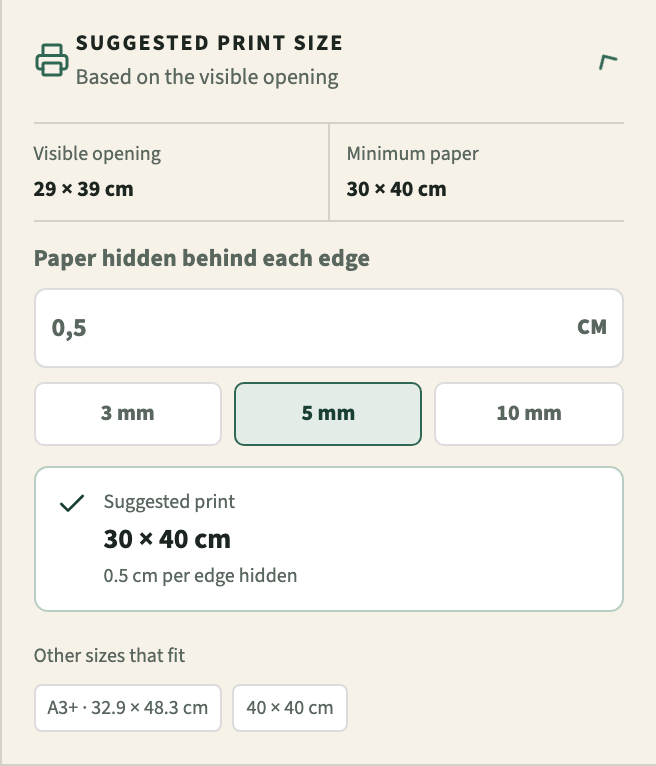
The default overlap is 5 mm per edge. Change it to match your printer or framer's instructions. For a manufacturer frame, the planner also checks the maximum paper size from the catalogue. For a custom frame, measure the space behind the mount or frame lip before placing an order.
How to make one print size report for the whole wall
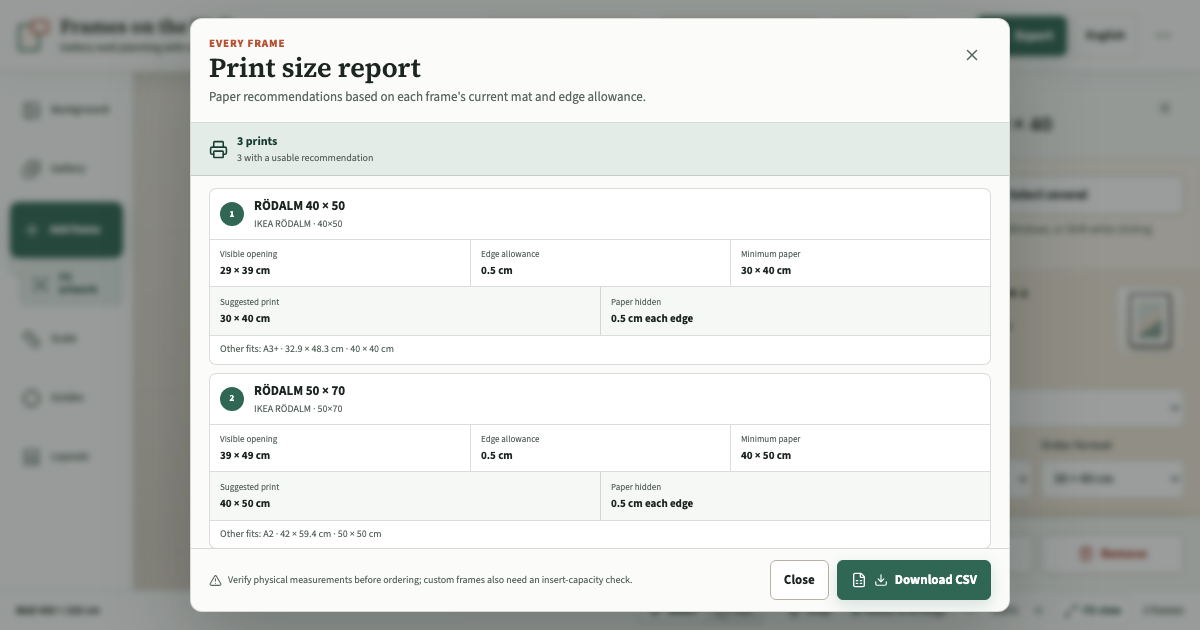
Once every frame has the right size and mount, collect all recommendations in one report.
Finish the frame details
Check each frame's series, format, orientation and Mat settings. The report uses the current settings, so make these changes before opening it.
Open the report
Click the three-dot More actions button in the top-right corner of the planner, then choose Print size report. You can also choose Export, followed by Print size report.
Review every row
For each frame, compare the visible opening, edge allowance, minimum paper and suggested print. Check any alternative sizes listed under Other fits. The report uses the cm or in unit selected in the top bar.
Download the list
Choose Download CSV to save the complete print order or send it to a print shop.
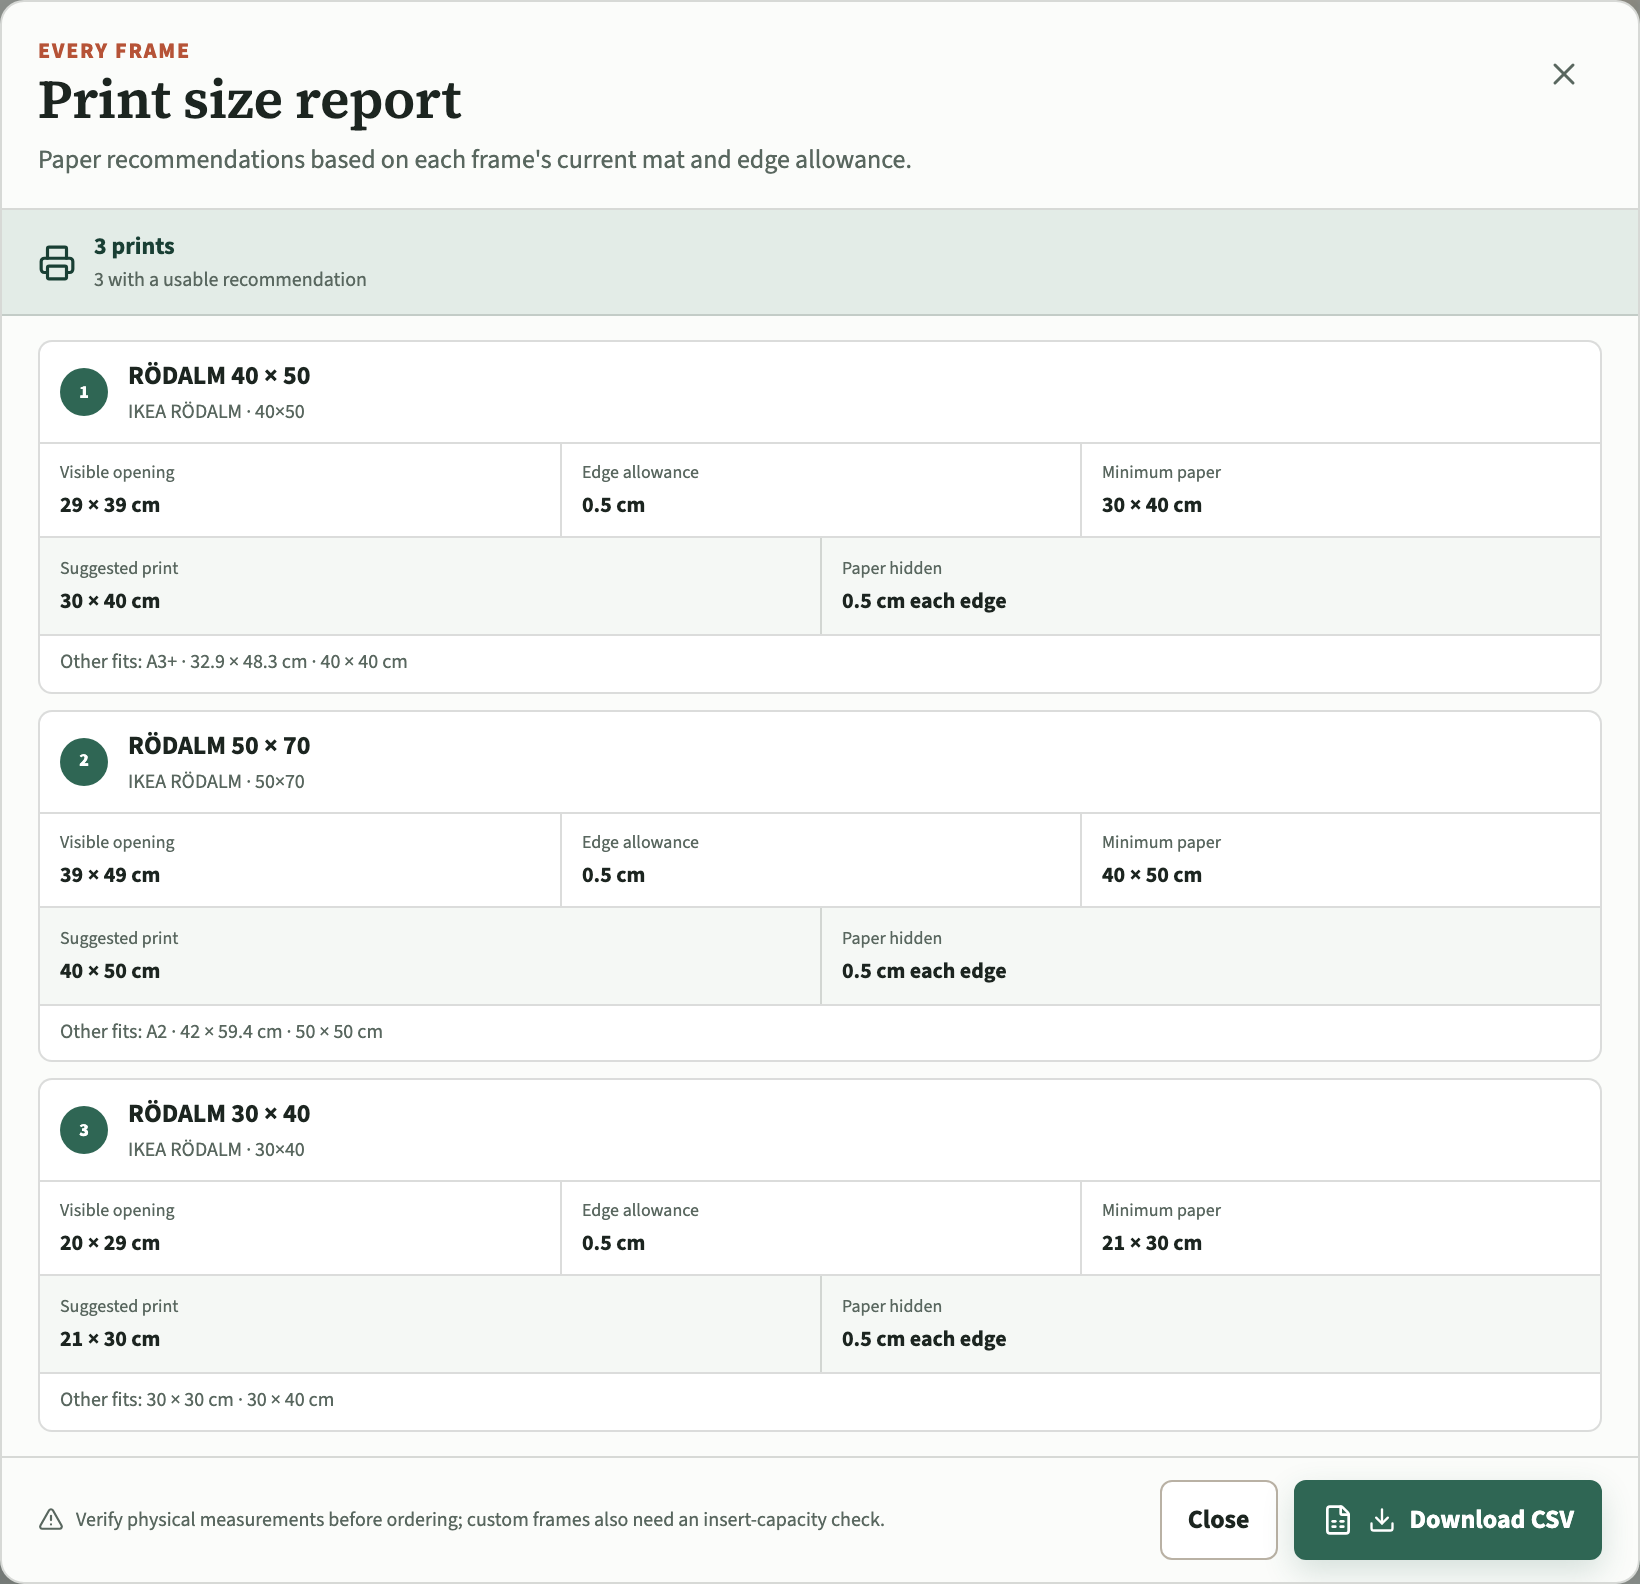
Review the list on screen or download it as a CSV file to send to a print shop. This is especially useful for a mixed gallery wall where a 30 × 40 cm frame, a 40 × 50 cm frame and a 50 × 70 cm frame may all need different paper sizes.
Common questions about frame and print sizes
Can I put a 30 × 40 cm print in a 40 × 50 cm frame?
Yes, when the frame has a mount with an opening close to 29 × 39 cm. A 30 × 40 cm print then sits behind the mount with about 5 mm hidden at each edge. Without a mount, use a 40 × 50 cm print instead.
What print size fits a 50 × 70 cm IKEA frame?
A 50 × 70 cm print fits without the included mount. In a RÖDALM frame, the mount opening is 39 × 49 cm, so a 40 × 50 cm print is the natural choice when you keep the mount.
What print size fits a 61 × 91 cm IKEA frame?
A 61 × 91 cm print fits the full picture format. For IKEA series with a 49 × 69 cm included mount opening, such as RÖDALM, a 50 × 70 cm print fits behind the mount.
Should the print be exactly the same size as the visible opening?
No. An exact match leaves no margin for positioning and can reveal a thin gap. Make the paper 3 to 5 mm larger than the opening on every edge unless the frame or printer gives different instructions.
Does image resolution change the print size that fits?
No. The paper's physical width and height determine whether it fits the frame. Pixel dimensions and print resolution determine how sharp the image looks at that size.
Can I calculate the recommended print size in inches?
Yes. Choose in from the display-units control at the top of the planner. The suggested print panel and full report switch to inches, and the planner checks common US print and paper sizes such as 8 × 10, 11 × 14, 16 × 20, Letter and Tabloid. IKEA UK RÖDALM frames still use metric product dimensions, so their inch values are approximate conversions. RÖDALM is not currently listed by IKEA US.
Check the opening before you order the print
The frame label is only the starting point. Decide whether you are keeping the mount, check its opening, add a small overlap and preview the crop. That gives you a print that is large enough to stay in place without hiding more of the picture than necessary.
Add your real frames to the planner and let each frame's measurements produce the suggested paper size. Once the wall is complete, export one report for the whole print order.
Find the print sizes for my frames